Our founder and CEO Zach Kaplan gave a talk recently at NYC MakerCon wherein he outlines the evolution of desktop fabrication and gives some idea of where this whole thing is going. The talk was recorded by the fine folks at Make Magazine, it's short and to the point and definitely worth checking out.
↧
Zach Kaplan's talk at MakerCon NYC
↧
It's getting spoooky in the workshop- this ABS filament might be haunted!
Everyone likes to make stuff, but Halloween brings about a particular type of DIY craftsmanship that we love in the Inventables office. So we decided to make a compendium of everything in our store that has Halloween written all over it, and we dug through the project archives to bring you some gems from our customers and staff that might give you the heebie-jeebies (in a good way).
Firstly, click this link to see the cornucopia of "halloweenable" materials in our store. Things that glow in the dark, light up, things to easily mold, and all sorts of materials in autumn colors, it's a lot. Here's a brief sampling:
![]()
![]()
![]()
![]()
Gold Bones by Justine Mendoza
A good number of our customers run Etsy shops and the like, making and selling their original designs using materials from Inventables. Justine Mendoza is one such entrepreneur, and her designs lend themselves well to the season.
![]()
![]()
Wonder Woman ring by Herbert Hoover
Herbert had a "ring a day" project going for a little while that used a lot of different Inventables materials. This one is a perfect piece of costume jewelry for cosplaying everyone's favorite radical feminist.
![]() Grinning Skull 3D Ring by Sasha Neri
Grinning Skull 3D Ring by Sasha Neri
Sasha is one of the facilitators at the Chicago Public Library's awesome maker lab. Download this design and make it on your own 3D printer, or head over to the library and make it there!
![]()
Are you working on a Halloween project? Take photos and send them to us to be featured in the next round-up!
Firstly, click this link to see the cornucopia of "halloweenable" materials in our store. Things that glow in the dark, light up, things to easily mold, and all sorts of materials in autumn colors, it's a lot. Here's a brief sampling:


And to get your gears turning, here's a few of our favorite customer projects:

Jeff is one of the software engineers behind Easel, and he is easily frightened by poorly aligned text. He was very brave to have finished this project.

A good number of our customers run Etsy shops and the like, making and selling their original designs using materials from Inventables. Justine Mendoza is one such entrepreneur, and her designs lend themselves well to the season.

Kelly Eident is another of our Etsy seller customers and she does amazing things with acrylic. This inlay technique is well done.

Herbert had a "ring a day" project going for a little while that used a lot of different Inventables materials. This one is a perfect piece of costume jewelry for cosplaying everyone's favorite radical feminist.

Sasha is one of the facilitators at the Chicago Public Library's awesome maker lab. Download this design and make it on your own 3D printer, or head over to the library and make it there!

Marc's design here suggests a lot of possibilities, but is constructed in a simple way by layering a colored transparent acrylic beneath a cut painted wood. If you want to make something similar, try a box generator like MakerCase to get started and then use a Shapeoko or laser to cut it out.
Are you working on a Halloween project? Take photos and send them to us to be featured in the next round-up!
↧
↧
Carvey: The 3D carving machine for the maker in all of us
On Tuesday October 21st at 8am CST Inventables launched a Kickstarter campaign for Carvey a new, remarkably easy to use, tabletop 3D carving machine for making ideas into real objects. I'm proud to say we hit our goal in 1 hour and 26 minutes!

The response for the community has been beyond belief. Thank you so much for all of the support for the Carvey project. We are so grateful. There have been some technical questions in the comments section about how precise Carvey is. We want to be as responsive as possible to the questions. In this video Chief Engineer Bart Dring uses a dial indicator that has 0.0005" accuracy. The dial indicator was bolted to the waste board on Carvey. He measures the X, Y, and Z axis to determine the precision and repeatability of the machine.
In the technical specifications we promised:
- Run out .0006"
- Resolution .001"
Our measurements on the actual machine are:
- Run out .0004"
- Repeatability on X: 0.0005"
- Repeatability on Y: 0.0005"
- Repeatability on Z: 0.0005"
*In the original post we stated repeatability on X and Y were 0. The use of significant digits was wrong. If you measure something with a wooden ruler and it is an inch wide you say 1 inch. If you measure with a caliper you might say 1.000 inch. Saying "0' implies it could be rounded by as much as 0.500"
While the eye can see the pointer only moved about a 1/5th of a tick on the scale, that does not mean the tool is that accurate.
The accuracy number I always give is 0.001 to 0.003. We do not guarantee all units will leave the factory at 0.001 on all axes.
There are also some questions about how well Carvey cuts soft metals like Aluminum. In our next update, we're going to film a series of videos to show this process so stay tuned! Thanks again for all your support and keep your questions coming!
↧
Pumpkin Carving with Easel and Shapeoko
Shapeoko 2 owner Winston Moy made an awesome video of how to use your Shapeoko to carve a pumpkin using Easel, our web-based CAD + CAM + machine control software.
The key is to remove the wasteboard and prop the Shapeoko up on stilts, giving you enough clearance to carve into the pumpkin. I think the most clever part is using a big coffee can to hold the spherical-ish pumpkin. Standard clamps don't work so well on pumpkins, as you might expect. And major props for giving a great introduction to using Easel!
Check out Winston's YouTube channel for a bunch of other awesome CNC projects. Also check out our projects section for more Shapeoko project ideas that you can open directly in Easel.
Keep it spooky.
↧
Carvey carves aluminum!
We are really excited that there has been a ton of interest in carving soft metals with Carvey. We're going to do a series of videos demonstrating how Carvey performs with a number of different soft metals. For the demo today we grabbed a 6" x 6" x .025" piece of black anodized aluminum from the Inventables warehouse. The project took about 35 minutes. Easel told Carvey to step down 0.001" per pass and to move at 15 in/min. Stay tuned next week for demonstrations on thicker metals and circuit boards!
↧
↧
Bonus Rewards for the Carvey Kickstarter
The speed we reached our goal was incredible and your energy was electric. We can’t thank you enough.
Thanks to your ongoing support and for helping us make this happen, we want to give each Carvey backer a bit extra. You've been so incredibly supportive so far in the campaign. We want everyone that gets a Carvey from our Kickstarter to have an amazing experience.
Getting started Kit!
Today we are adding a few new things to the Early Bird Carvey and Carvey levels. There are a lot of backers that are new to 3D Carving and this will be their first time carving. We want to make sure that your first experience is magical.
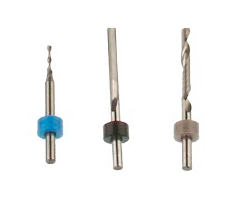
To that end, we will be adding a piece of Expanded PVC foam material into the box, so you’ll be able to make something as soon as you open the machine. The incredible thing about Carvey is its versatility. The milling bits it uses are like lenses in a professional camera: new bits expand your creative abilities. We started you with a ⅛” 2 flute spiral end mill (grey) ideal for carving plastic or materials like the expanded PVC. Today we’ve added a second ⅛” 2 flute straight (black) end mill for cutting wood and a 1/16” fish tail bit (blue) for doing detail work! Our bit system is color coded and integrated with the Easel software making selection easier.
50% More Material
Thanks to everyone that backed at a level that received the Ultimate Maker pack. We have some good news for you too.
First off, we’re going to give you all the bonuses mentioned above.
In addition to the 3 starter projects and 20 materials included today, we are adding 10 more materials. With these materials in hand you’ll be able to carve all sorts of cool things like jewelry, signs, coasters, and christmas ornaments - we can’t wait to see what you create. Below is a full list of everything you’ll get in the pack. The 10 new materials are highlighted in green.

As always thank you for your support, and we hope this goes some way in showing how grateful we are that you’ve made Carvey a reality.
↧
Weekend project inspiration
The weekend is finally here so it is time to get making! Here are a few awesome projects from the last couple weeks that you can open and mill directly from Easel. Have something awesome to show off? Post it as a project and we'll feature it!
 |
| Learn how to make bevelled edges using a V bit. |
 |
| DIY a colorful clamp set |
 |
| Get started with milling circuit boards |
 |
| Community Project: Servo controlled robot eyes |
↧
Holiday ornament projects to make at home

In giddy anticipation of the impending holiday season, our own designer Alex Berger created a handful of fun projects to share. These simple ornaments can be cut on a Shapeoko or a laser cutter, which means you're free to use all kids of materials- natural woods for a more traditional, rustic look, or even glitter acrylics to add a twinkle to your home.
Take a look through our materials section for inspiration:

All of these projects have an "Open in Easel" link for you to resize and customize to your heart's content. Have fun! And send us your re-makes!


↧
Snowflake Generator
We used to love making paper snowflakes, folding a piece of paper into quarters and snipping little pieces out, then unfolding it into a radially repeating geometric shape.
Then, our software engineer Paul Kaplan showed us this and we all put down our scissors and started using it instead.
It's an online snowflake generator! You create shapes in the same sort of repeating way as the folded paper method, but with more control and variability. Originally created as a Processing sketch by Windell Oske at Evil Mad Scientist, Paul ported it to the web and added the ability to download SVG files.
Play around adjusting the handles to make the perfect unique snowflake, then you can download an .svg of the design and bring that into either Easel or your favorite lasercutting or papercutting software and let your Shapeoko, laser cutter, or paper cutter work its magic.
We like glitter acrylics. But maybe you like wood veneer, or just plain old adhesive paper. Or just paper.
Try it out for yourself:
Then import that .svg into Easel and get wild with the snowflake-making. You could even add a little hole into one of the edges to tie a piece of yarn through, like this:
![]()
![]()
![]()
Then, our software engineer Paul Kaplan showed us this and we all put down our scissors and started using it instead.
It's an online snowflake generator! You create shapes in the same sort of repeating way as the folded paper method, but with more control and variability. Originally created as a Processing sketch by Windell Oske at Evil Mad Scientist, Paul ported it to the web and added the ability to download SVG files.
Play around adjusting the handles to make the perfect unique snowflake, then you can download an .svg of the design and bring that into either Easel or your favorite lasercutting or papercutting software and let your Shapeoko, laser cutter, or paper cutter work its magic.
We like glitter acrylics. But maybe you like wood veneer, or just plain old adhesive paper. Or just paper.
Try it out for yourself:
Then import that .svg into Easel and get wild with the snowflake-making. You could even add a little hole into one of the edges to tie a piece of yarn through, like this:

Have fun, and please tweet a photo at us if you make one!


↧
↧
DIY Gift box roundup!
We all would love to make every holiday gift from scratch, especially for family and loved ones. But there isn't always time, you may not have the right tools or materials or skills, and then all of a sudden there's two weeks left and what to do?
If you have a 3D Carving machine on hand, there's an easy way to put a personal touch on a thoughtful gift: make a wooden gift box!
Turns out it's pretty easy to do and there's a couple of different ways to go about it. A few strategies, with examples:
Boxes with mating halves
A box with mating halves is one of the easiest to make, because there's only one joined edge, and you can just glue the pieces together. Adding a nice detail like an initial or icon adds that extra bit of fancy and earns you major bonus points. This one was made by Tait Leswing, click through for the project details:
![]()
Here's another example from our programmer Jim Rodovich using a more complex shape as the outline:
![]()
Parametric box generators
There are some great online tools for generating laserable and carveable box patterns. Here's a few example made by our own Paul Kaplan, click through for the project files:
![]()
To make your own box like this, consider using Makercase or Makeabox.io. Both are web-based parametric box pattern generators that allow you to specify dimensions, material width, kerf and etc to make a perfectly laserable or carveable box pattern in vector format.
![]()
![]()
![]()
If you have a 3D Carving machine on hand, there's an easy way to put a personal touch on a thoughtful gift: make a wooden gift box!
Turns out it's pretty easy to do and there's a couple of different ways to go about it. A few strategies, with examples:
Boxes with mating halves
A box with mating halves is one of the easiest to make, because there's only one joined edge, and you can just glue the pieces together. Adding a nice detail like an initial or icon adds that extra bit of fancy and earns you major bonus points. This one was made by Tait Leswing, click through for the project details:

Here's another example from our programmer Jim Rodovich using a more complex shape as the outline:

Parametric box generators
There are some great online tools for generating laserable and carveable box patterns. Here's a few example made by our own Paul Kaplan, click through for the project files:

To make your own box like this, consider using Makercase or Makeabox.io. Both are web-based parametric box pattern generators that allow you to specify dimensions, material width, kerf and etc to make a perfectly laserable or carveable box pattern in vector format.


Protip: set the "kerf" width to the width of your cutting bit for a perfect fit. This won't solve the need for "dog bones", but it'll get you pretty close. I find that using a 1/16" bit makes the parts fit well enough to knock together with a rubber mallet. A little glue for insurance and you're set.
Add a sliding lid!
Another nice touch is to take the above example and add a sliding lid to one of the faces for more secure opening/closing, like this example from Paul Kaplan:

There are a whole lot more ways to go about this, but that should be enough to get you started. Have you made your own boxes and have some projects to share? Hit us up in the comments and we'll feature everyone in a future roundup.
↧
A visit to Lane Tech Hight School's Innovation & Creation Lab
A little while back we helped high school Computer Science teach Jeff Solin spec out a maker lab for his school. Many months and lots of sweat later, the Innovation and Creation Lab is up and running and Jeff's students are making a lot of awesome projects.
Here's a vent cover one of the students designed with Jeff's face on it:
![]()
The first part of this year's curriculum focused on the laser cutters, with students starting out making cubic boxes and moving to freeform projects from there:
![]()
![]()
![]()
![]()
![]()
![]()
![]()
![]() Inventables' Tait Leswing was on hand to make sure all the machines were in good working order.
Inventables' Tait Leswing was on hand to make sure all the machines were in good working order.
![]()
![]()
We're looking forward to seeing more as Jeff and his students get comfortable with the machines and really start to dig in.
Here's a vent cover one of the students designed with Jeff's face on it:

The first part of this year's curriculum focused on the laser cutters, with students starting out making cubic boxes and moving to freeform projects from there:


Phase II involves each student designing a 6"x6" tile in Easel and then carving it out on a Shapeoko:


Here's Jeff showing the first completed tile to the class. Once all the pieces are finished, they'll be assembled into a grid and displayed in the room. As you can tell, he was pretty excited about it:

↧
Our favorite projects of 2014
Now that's we've had a chance to recover from the holidays, the Inventables team put together a quick roundup of our favorite projects of 2014. What was your favorite project? Share it in the comments and we'll compile a list of our customer's favorites for next week.
In no particular order:
![]()
Engagement ring box by Joe Ternus. This project went viral and for good reason- it's beautiful, it's a heartwarming story, and it was all made using one of our desktop 3D carving kits. Photos of the design and building process here.
Bar Mixvah bartending robot by Yu Jiang Tham. Uses 3D printed parts, peristaltic pumps and an Arduino to make custom drinks, with in iPad interface. Full blog documenting the build here.
![]()
MDF laptop stand by our own Paul Kaplan. A 3D model from 123D Make that was sliced into carveable 2D shapes and cut with Easel. Instructions to slice your own 3D models or make this laptop stand here.
![]()
![]()
RepRap Wally by Nicholas Seward. Unique DIY 3D printer design that uses a tri-polar coordinate system for motor control. Full development discussion on the RepRap forums here.
![]()
Monogrammed box by our own Tait Leswing. Super easy to make, instructions here.
Our customer Martin P. made an awesome bit of custom software and tutorial for height probing using the new features in GRBL 0.9, for measuring variance in the surface of a copper board before milling a PCB. This is some legit work that solves a real problem! Full blog post here.
So what was your favorite? Wanna how off something you're proud of? Post yours in the comments below and we'll feature them in the next blog post.
In no particular order:

Engagement ring box by Joe Ternus. This project went viral and for good reason- it's beautiful, it's a heartwarming story, and it was all made using one of our desktop 3D carving kits. Photos of the design and building process here.
Bar Mixvah bartending robot by Yu Jiang Tham. Uses 3D printed parts, peristaltic pumps and an Arduino to make custom drinks, with in iPad interface. Full blog documenting the build here.

MDF laptop stand by our own Paul Kaplan. A 3D model from 123D Make that was sliced into carveable 2D shapes and cut with Easel. Instructions to slice your own 3D models or make this laptop stand here.

Word clock by buckeyeguy89. It lights up to tell you the time in a more prosaic format, and once a year it turns rainbow colors to with his brother and sister-in-law happy birthday. Full instructions in the imgur album.

Lightning box by our own Jim Rodovich. It's a two-sided box with mating halves, made on a desktop 3D carving machine. Instructions to make your own located here.
RepRap Wally by Nicholas Seward. Unique DIY 3D printer design that uses a tri-polar coordinate system for motor control. Full development discussion on the RepRap forums here.

Monogrammed box by our own Tait Leswing. Super easy to make, instructions here.
Our customer Martin P. made an awesome bit of custom software and tutorial for height probing using the new features in GRBL 0.9, for measuring variance in the surface of a copper board before milling a PCB. This is some legit work that solves a real problem! Full blog post here.
So what was your favorite? Wanna how off something you're proud of? Post yours in the comments below and we'll feature them in the next blog post.
↧
A Better Way to Wire Your DC Power Supply?
The Problem

The basic enclosed power supply is the workhorse of the DIY CNC world. It is used in most small scale 3D printers and CNC routers. Unfortunately they are not the easiest items to wire cleanly. They are also difficult to add a power switch to. It gets even uglier when you add things like power controls for DC Spindles.
A Simple Solution

For a little side project, I had a few of these PCBs made. This is a simple little PCB that screws right onto the terminal block of the power supply. It cleanly adds a universal AC input socket with a switch. This assembly can be easily mounted to the wall of an enclosure.
The DC power is brought out to a large terminal block. The DC output has two sets of terminals on a pluggable terminal block. The right set of two terminals are powered whenever the switch is in the on position. The left two are controlled by a 5V signal (and the switch). This can be used as an on/off control or a replacement for your speed controller using a PWM signal. GRBL and TinyG both have PWM options for speed control.
How would it be used?

Mount the PCB assembly to the power supply terminal block. Connect your device to either the always on terminals or the logic controlled terminals. You can use both sets if you have two devices and you want one to always be on and one to be controlled via a logic signal. Connect your logic signal to the smaller terminal block. You could also wire a simple switch that connects +5V to the logic input for low-voltage manual control.
Here it is being controlled via a signal generator with a 0-5V square wave.

Limitations
Not all power supplies are alike. You need one with the correct orientation and the AC connections on the right side. Inventables power supplies are like this. The PWM-responsive circuit is designed for a maximum of 48VDC and about 8.5Amps before active cooling will be required.
Note: This does not have a knob for speed control- It needs to be done via your controller.
Safety

This is design for people comfortable with AC line voltages. There are several places with live exposed voltages. The end user should ensure the application is safe. Make sure to select the appropriate power supply (48VDC max) for your application. Do not exceed the maximum current of 8.5A. With this said, the scattered wire alternative is probably less safe.
Carry it or bury it?
We are in the process of determining if there is enough demand for this product. If you think we should sell it, sign up on the product page to be notified when it is available. If the signup count hits about 40 in a reasonable time, we will stock it. Also feel free to comment on this post too.
The sell price is probably going to be in the $20-$30 range, which is cheaper than the existing speed controller. It will be sold as a kit that requires very basic solder skills. We will include detailed instructions for usage.
If it proves to be a popular product we might make version for other power supply types.
↧
↧
Making stuff and rocking out with White Mystery!
We unexpectedly got to hang out with local rockers White Mystery at the Chicago Made booth at SxSW last year. They were curious about our machines and we really enjoyed their "acoustic" set in the middle of the trade show floor. Once we were all back in Chicago, they came by our workshop a few times to prototype some ideas.
To give you an idea of what they're about, here's a music video from their most recent album Dubble Dragon:
The projects continue to evolve as the dynamic duo stops in during breaks in their grueling tour schedule. Here's a few highlights from the last couple sessions, making some bling for their merch table at shows and pop-up paper doll business cards:
![]()
![]()
![]()
![]()
![]()
To give you an idea of what they're about, here's a music video from their most recent album Dubble Dragon:
The projects continue to evolve as the dynamic duo stops in during breaks in their grueling tour schedule. Here's a few highlights from the last couple sessions, making some bling for their merch table at shows and pop-up paper doll business cards:


Here's to making more awesome projects in 2015!
↧
Power Supply Interface Follow Up

Thanks for all the feedback on the DC Power Supply Interface PCB we posted last week. We got enough signups on the product page to justify moving forward. We digested all the suggestions we received and finalized a design. Here is a quick rendering of what it will look like.

- We added a shroud to the assembly to make it safer, stronger and easier to use. The shroud is aluminum and is silkscreened with labels for all the features.
- We moved the PWM connection to the front on a terminal block.
- We added a 3 positon switch for the spindle.
- The top position turns the spindle on full power.
- The center position turns the spindle off.
- The bottom position enables PWM control from your controller
↧
TB6600 Stepper Driver Shield
Can your grbl based CNC setup control all this equipment (at the same time!)?
![]()
![]()
![]()

This is what is in the picture.
- (4) Stepper motors, each on its own driver with up to 4.5amps of current and 40V. The Y axis uses (2) synchronized stepper motors
- X,Y & Z homing switches on optically isolated circuits.
- Z Touch disk on an optically isolated circuit.
- 3 Spindles
- DC Quiet Cut Spindle with speed control.
- AC Trim router with on/off control
- 3 phase VFD controlled spindle with 0-10V speed control.
- Vacuum controlled by gcodes M7,M8,M9
- Feed control buttons (Hold & Resume)
Introducing the TB6600 Shield

This shield routes all of the signals on the Arduino UNO to the right places on the TB6600 Stepper Driver PCB. It also adds an on board DC spindle control and feed control buttons. There are 3 and 4 axis versions of the TB6600 board. On the 4 axis version, the extra axis is slaved to the Y axis for Shapeoko 2 type machines. The only option you need to configure with grbl is whether or not you are using a variable speed spindle. For a fixed speed router like an AC trim router, you use one of the relays. With a variable speed router you can use both relays for accessories.
About the TB6600 Stepper Driver
This is a very powerful and versatile all in one stepper driver and CNC machine interface board. You can get them on eBay and other sources. There are different version, but most of them should work. We spent some time testing these and will be selling the highest quality one we found. Here are the major features.
- 3 or 4 axes of 4.5 Amp stepper drivers.
- Switch selectable resolution from full step to 1/16 microstepping
- Switch selectable current per axis.
- Automatic 50% idle current reduction implemented independently per axis. This means each motor drops its current shortly after it receives the last step. This allows the motors to run cooler. Stepper motors draw the most current when they are not moving and are very strong in this mode, so they don't need full current.
- 100% optical isolation on all I/O. This prevent shorts, voltage spikes or wiring errors from breaking you controller
- High current AC relays.
- .PWM to 0-10VDC conversion circuit for VFD based spindles.
They are designed to work with PC based software like Mach3 on a parallel port. Things get complicated if you want to run this from a USB port on a Mac or PC laptop with open source tools. This little shield removes all that complexity.
Carry It or Bury It?
We have it designed and tested and a have a few, but we want to gauge demand before buying hundreds of them. Please check out the product page and add your name the waiting list it you want to cast a vote for "carry it"

↧
Customer Project Spotlight: Matthew White
We were tweeted this photo the other day from Indiana hackerspace The MakerHive:
![]()
This is the kind of thing that gets the Inventables team really excited. It's a custom mount for the Rostock Max 3D printer made by our neighbors to the South at SeeMeCNC.
We did some sleuthing and got in touch with the person who made these, a customer of ours named Matthew White. He wrote us back with some details about this project:
"The mill work did come off a Shapeoko V2 and I was the one who designed and milled it. Thank you for the kind comments on my work. The work in question is a new mount for the SEEMECNC Rostock V2 3D printer to use the E3D V6 print head.
![]()
![]()
![]()

This is the kind of thing that gets the Inventables team really excited. It's a custom mount for the Rostock Max 3D printer made by our neighbors to the South at SeeMeCNC.
We did some sleuthing and got in touch with the person who made these, a customer of ours named Matthew White. He wrote us back with some details about this project:
"The mill work did come off a Shapeoko V2 and I was the one who designed and milled it. Thank you for the kind comments on my work. The work in question is a new mount for the SEEMECNC Rostock V2 3D printer to use the E3D V6 print head.
My mill is a Shapeoko V2 with the 400W motor and is run by a TinyG board. I use a full metal bed and custom 3d printed motor mount, end stop switch mounts and cable chain. I also have the upgraded Z axis kit."

For those who question whether our Quiet Cut Spindle is tough enough for a given job, this should be proof enough.
![]()
![]()
![]()
"It is out of ¼ 6061 which was faced down to 6mm from 6.35mm and then was milled out to make the mount. It is then placed in a tumbler for a 3 stage finishing process and then anodized to the chosen color.
From start to finish it is about a 26Hr process per mount due to milling the aluminum and the needed slow speeds. Everything is done here at my place (house) including the anodizing. I am a sports photographer by trade but milling and 3d printing are my hobbies.

I am lucky enough to have access to Solidworks which I used for the CAD portion and I used HSMXpress to do the CAM toolpaths. It uses a 1.58mm 2 flute endmill, a 3 flute Destiny VIPER 3mm end mill and a 3MM 45 degree chamfer endmill to cut everything out. I also use the mill to cut the custom length carbon fiber tube spacers. They are capped off with milled 6061 caps which are anodized to match and tapped to M3 for attaching the head to the printer. I included a final render to give you an idea of what I am speaking about."


Matthew also sent along some images of another project he made out of aluminum, some custom Texas A&M keychains:


Fantastic work Matthew! Please keep it up.
Do any of our readers have an awesome project to share? Document your project and send it to us!
↧
↧
Say Hello to X-Carve
Today Inventables launched X-Carve, our next generation 3D Carving machine. It’s the start of a new chapter for us and we’re very excited.
Our mission at Inventables is to bring out the maker in all of us. We envision a world where the the digital fabrication revolution empowers a new generation of makers to be able to dream, design, and fabricate their ideas into products. We believe low cost digital manufacturing tools are making it easier for people to prototype and do short production runs. We believe by focusing on making the experience easier, we’re helping to ignite this change in not only what products can be made but, more importantly, who can make them.
In 2012, we collaborated with inventor Bart Dring to commercialize the MakerSlide railing system. Later that year, with MakerSlide as the foundation, we started selling a fully open source (open hardware) 3-axis 3D carving machine kit that anyone could build. The kit cost about $300 for the mechanicals and $600 for the fully functioning machine. Most people that bought the machine were hobbyists and enthusiasts. The response was tremendous.
Over the last few years, as the technology improved, we’ve started to observe a transition by our customers. What was once predominantly a group of hobbyists building a machine for the love of the game has transitioned to a group that also includes folks making and selling products for fun and profit. We are inspired by the amazing ways customers have brought ideas out of their heads and into the world. They make everything from circuit boards to skateboards.
In March of 2014, we launched Easel. It was a step towards taking complexity out of the process. We wanted to simplify the software tool chain so you can “just click carve”. It was part of a realization that the world needed more than a new machine- it needed an incredibly easy system (software, hardware, and materials).
We needed a brand to represent our vision and serve the trajectory our customers were on. We needed a brand to go beyond servicing a hobby and one that could deliver on production work in the shop.
Enter X-Carve. The letter X in the name is intended as a variable that is defined by the customer. We hear from customers that their needs are unique and they don’t want extra parts lying around. We hear from customers that they want an upgrade path. We hear from customers they want a machine that can grow with their needs.
X-Carve is capable of creating precision parts and models from plastic, wood and metal. The machine is the latest addition to Inventables’ 3D Carving ecosystem, which also includes our Easel design and machine control software, a project-sharing website, a selection of hundreds of carvable materials, and Carvey, an enclosed machine suitable for an office or home setting.
X-Carve was created for a workshop setting. It has about half the parts of other kits on the market, and is both customizable and expandable. It is also fully compatible with the previous 3D Carving kit offered by Inventables, the Shapeoko 2. We’re also selling an upgrade kit because we don’t want to leave anyone behind. We put together an introductory video walking through all the details.

The Inventables website guides users through customizing the exact machine they want. Parts will also be available a la carte. We heard over and over again that people want to build machines in different sizes, with different electronics, and motors to fit their specific needs. In response, we built a tool that will allow them to customize a machine to do exactly what they want without having to buy unnecessary parts.
![]()
Please join us in this next chapter at Inventables by making your mark on the world.
↧
X-Carve Shipping Update!
The transition to X-Carve has been a huge undertaking for everyone at Inventables, encompassing a multitude of projects and collaborations from every team. Engineering, software development, purchasing, customer support, warehouse operations and all the rest have been hustling to get this product designed and in our customers' hands as quickly as possible.
Now that we've finally announced it to the world, things are moving really fast! In order to get shipping as fast as possible, we're making a lot of changes to our warehouse that should help us increase our speed and efficiency, while keeping our error rates as low as humanly possible.

Our operations manager Phil is making some big organizational changes in the warehouse this week, and none too soon as our truckloads of X-Carve parts have started to arrive!
Here's Phil examining some of the 1000mm MakerSlide fresh from the anodizer-->
That's two pallets of MakerSlide on the ground next to him. Over the coming days we'll be checking each rail individually for dings, nicks, straightness, and anodizing consistency. They'll then be stacked onto shelves in the X-Carve kitting area being set up, as soon as those shelves are built.
Also arrived: Switching 24v Power Supplies!

Thousands of belt clips and drag chain mounts!


Cases of 24v cooling fans and Arduinos flashed with GRBL!


Giant spools of wire and so many oak clamps!


Literally a thousand pounds (450kg) of NEMA 23 stepper motors! Fun fact: the NEMA 23's that ship with X-Carve have 140lbs of holding torque. Beefy.

Stacks of 1000mm wasteboards and more drag chain than we've even see in one place!


And did we mention MakerSlide? Lots of MakerSlide. Not pictured: like six more pallets of MakerSlide in various lengths.

As we set up our processes, we're still working on refining parts of the customer experience. Here's Paul Kaplan from our software development team putting a little thought into the way the different X-Carve modules fit into the box. Since X-Carve is a kit that the customer puts together, it's really important to us that the process is very clear and organized from the moment you open the box.
Paul is the Inventables Tetris champion so we figured he'd be the best one to solve this problem.

And last but not least, here's a snapshot of what the process looks like on our inventory check-in workstation. Here's Lisa checking in a batch of v-wheels before they go on the shelves. We inspect every part for consistency and quality, weeding out any factory mistakes before a customer ever sees them. Last month our inventory team had a 0% error rate, which is a pretty big deal.

We'll keep you updated on our progress as the shipping date approaches. Some of the next parts to land are the awesome custom extrusions that make up the X-Z and spindle carriages, and we've got some secret new stuff coming in to the store that we're really excited about.
In the meantime, we're putting in the hours on our handful of early X-Carves in the shop, we've got beta testers out in the field checking through the build process and assembly instructions, and we're responding to all the excellent questions coming in on the new forum.
Thanks for all the feedback and support so far, please keep it coming and we'll get these X-Carves shipped as fast as we can!
↧
Meet the Inventables Customer Success team!
What Is Customer Success?
If you’ve contacted a company with a customer service issue in recent years you have likely been forced to deal strictly with automated, self service menus or impersonal scripted FAQ responses. While these tools can be effective and have their uses we think that helpful, personal support from real people still has a place in the world. That is why our Customer Success team is built on real people who are experts at helping people succeed and get the results they need. That's why we call it Customer Success. We're here to help you succeed. To do this, we take risks, operate differently and work on continuous improvement. We purposely don’t always follow the status quo or do what the other businesses are doing. Instead, we think of the times we’ve experienced bad customer service in our personal lives, and do the opposite for our customers. Get to know some of the real people that work on our team below.
If you ever have a question or issue that needs attention, contact us at help@inventables.com or via phone during business hours at (312) 775-7009 and we'll take care of you as fast as we can. Yes, we will answer the phone when you call, and we respond to all emails sent during business hours on the same business day.
Why it works so well
It’s not about us. We’re focused on your success. Everyone at Inventables is a maker and tinkerer in their own right, which is what makes the team so effective in helping our customers achieve their goals. We're all constantly working on our own projects and trying out new techniques, so we empathize very much with the frustrations involved in trying to bring a new idea into the world.
We’re part of a larger community. We’re doing our best to help grow and nurture that community. We are fortunate enough to get to do this every day. We understand that this stuff is hard. We constantly take a beginner's mindset and realize that we must be focused on helping all our customers regardless of their experience level.
Our Process
When you send us an email, it gets queued up in Desk, an app we use to help us manage the volume of communications we receive every day. Here's an example of what the interface looks like from our side of things:

Once your email is received, it gets assigned to a member of our Customer Success team who is then responsible for the case until it's completely resolved- which only occurs when the customer is satisfied with the outcome. We take customer issues very seriously, and treat every single one with the same level of importance. Sometimes it goes as far as doing a "root cause analysis" to figure out where we screwed up, and implementing new policies and procedures to prevent those things from happening again.
For example- if two customers say they were short a few washers in their 3D Carving kit, we don't just ship them replacement washers and call it a day. We investigate the process by which washers are counted and packed, and make changes to the process to ensure it doesn't happen again. All of our teams are constantly improving our processes and we value feedback from our customers as a very important piece of that puzzle.
We track and attempt to improve a number of internal performance metrics in Desk, including how long it takes for us to respond to a new case, and how long it takes for cases to be resolved. We also track a Net Happiness score aggregated from customer feedback. You may have noticed this little "temperature gauge" at the bottom of emails from the CS team- we take this feedback seriously and review the data every day as part of our process.

Our Team
So, who are the people who answer those phones and reply to all those emails?
Phil Lomac

Phil is our operations manager and head of customer success. He splits his time between stepping in to help answer emails and phone calls from customers and overseeing our warehouse and manufacturing activities. Phil is also a long time musician/songwriter who enjoys tinkering with different instrument designs and is currently prototyping a small line of stringed instruments made from various reclaimed materials.
Paul Stolz

Paul is our newest member of the CS team and handles the administrative side of things- refunds, shipping adjustments, and bookkeeping matters- in addition to tending the phones and email cases that come in. Paul's an avid musician and has been playing with some 3D printed guitar capo designs. When he's not at work you can catch him playing shows with his band Pool Holograph. Fun fact: Paul's bandmate Wyatt Grant is our warehouse shipping manager!
John Hayes

John is focused on resolving 3D Carving technical issues. He came to Inventables as one of our earliest customers, from way back when we had just started selling the original Shapeoko 1. Lately John has been testing the build instructions for X-Carve, making sure all the parts match up and no steps are missed. In his off hours, John's working on building a set of foot stools using traditional woodworking techniques and has plans to engrave the seats with mathematical designs using his 3D carving machine at home. He's also working on restoring a Honda CB350 motorcycle in his apartment's living room.
Samantha Alaimo

Our own Queen of Lasers, Sam is one of Inventables' longest-tenured employees and has worn a lot of hats here. She started her career as our Resident Designer and is also our Fabrication Lab Specialist, in addition to being on the CS team. Sam studied Design Objects at the Art Institute of Chicago and runs a little shop called Logan Lasers in her off hours, providing custom laser fabrication services.
Now that you can put a face to the names, drop us a line and say hi! The CS team is standing by to help you configure an X-Carve, order a Carvey, test out Easel, expedite shipping, or figure out which milling bits to use for a new project.
Oh, and some of those topics are good for discussion over at the Inventables forum as well. Check it out: https://discuss.inventables.com/
↧